
What is Git and How to use it?

Git is a free and open-source version control system (VCS) used by developers for tracking changes in the source code during the development of software. It is extremely popular in DevOps for managing and maintaining codebases successfully. Git was developed by Linus Torvalds in the year 2005 for the development of the Linux kernel. Since then, it has become the industry standard of version control, adopted by single developers and big teams alike. In this tutorial, we will see what Git is and how to use it.
What is Git?
Git is a version control system created to track changes in computer files, which makes it an important tool for programmers globally. Git can handle projects of all sizes. Git facilitates collaboration among team members by coordinating their workflow and tracking progress over time. It is beneficial to both developers and non-developers to manage their project files. Git allows many users to collaborate without disturbing one another's work.
How Does Git Work?
Git works by storing all your files and their changes in a local repository on your computer. As you update, Git generates commits, or snapshots of your files at one particular point. Commits are chained together to build a record of changes and give you a timeline of development for your project.
Every commit has a special identifier (a hash) that allows you to follow, compare, and even roll back changes if necessary. For example, if you need to return to an earlier version of your project, Git makes it easy to roll back to an older commit in the history. This allows you to observe how your project has progressed over time and keep changes organized.
Here are the key benefits of Git:
- Track Changes: Git makes it easier for developers to keep track of all changes that are made to the code. Having a historical record makes it simple to pinpoint problems, debug, and solve bugs effectively.
- IDE Integration: Git is integrated mostly in development environments like VSCode and JupyterLab to make version control easier for developers. The integration makes the workflow smoother and easy to use Git.
- Collaboration: Team collaboration is made possible by Git. Developers can work on separate tasks in their own branches and then merge the changes into the project. Features like pull requests, merge conflicts, and code review enable fruitful collaboration.
- Distributed Version Control: Git does not rely on a single storage central server. Instead, every contributor maintains a full copy of the project, acting as a backup as well. Distributed enables offline work and committing changes on reconnection, offering reliability and flexibility.
Git is a powerful and core developer's tool that manages source code, collaboration, and versioning effectively. The branching, merging, and distributed development capabilities of Git make it one of the most powerful tools for managing code and monitoring changes over time. Whether you are developing a small project individually or working with others on a massive open-source project, Git has a scalable, flexible, and powerful system for effectively managing your codebase.
Related topics you may enjoy reading: How to create an NTFS file system for disks in Windows and Ubuntu.
Branching in Git
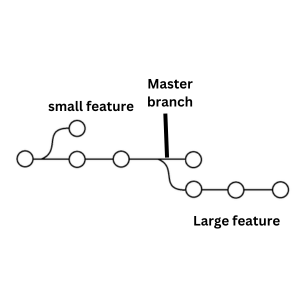
A branch in Git allows developers to work on new features or fixes without disturbing the main codebase (typically the master branch). Once work on a branch is completed, it can be merged with the main branch (master), ensuring stability.
Git Workflow
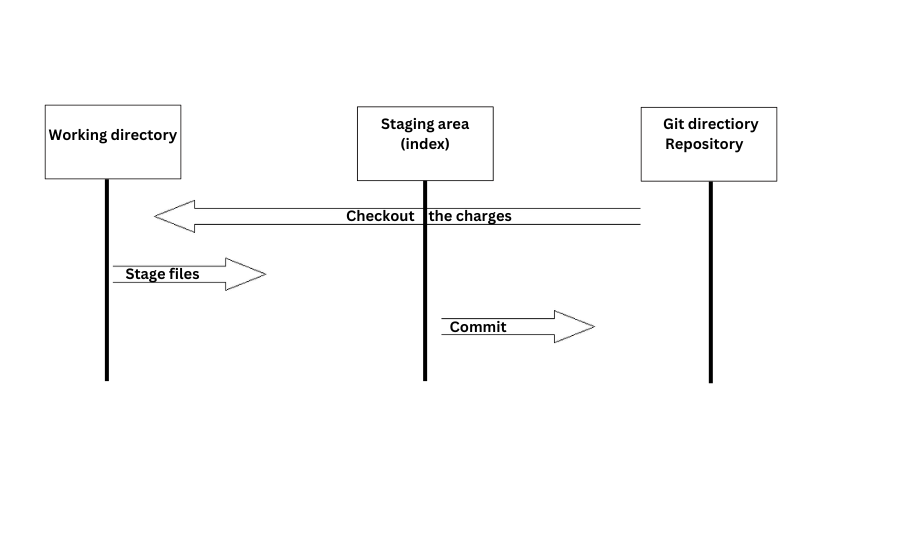
Git workflow refers to the process of tracking and managing files and changes in a Git project. There are three key states in the Git workflow:
- Working Directory: This is where you modify your files. The working directory contains the files that you’re actively working on.
- Staging Area (Index): Files must be staged in the staging area before committing changes. This allows you to prepare snapshots of your changes before committing them.
- Git Directory (Repository): This is where Git stores the committed files. After changes are staged, they can be committed, which stores a permanent snapshot of those files in your repository.
Git Commands
Here are some common Git commands :
Setup and Configuration
- git config --global user. name "Your Name"
Set your name for commits. - git config --global user.email "youremail@example.com"
Set your email for commits. - git config --list
View your configuration settings.
Repository Management
- git init
Initialize a new Git repository. - git clone <repository_url>
Clone an existing repository. - git status
Show the status of your working directory and staging area.
Working with Changes
- git add <file>
Add a file to the staging area. - git add .
Add all changes (new, modified, deleted files) to the staging area. - git commit -m "Commit message"
Commit staged changes with a message. - git diff
Show changes between the working directory and the index (staging area). - git diff <file>
Show changes for a specific file. - git reset <file>
Unstage a file.
Branching and Merging
- git branch
List all branches. - git branch <branch_name>
Create a new branch. - git checkout <branch_name>
Switch to a specific branch. - git checkout -b <branch_name>
Create a new branch and switch to it. - git merge <branch_name>
Merge changes from another branch into the current branch. - git branch -d <branch_name>
Delete a branch. - git merge --abort
Abort a merge in progress.
Remote Repositories
- git remote add origin <repository_url>
Add a remote repository. - git push origin <branch_name>
Push your changes to a remote repository. - git push origin --delete <branch_name>
Delete a remote branch. - git fetch
Fetch changes from the remote repository but doesn't merge. - git pull origin <branch_name>
Fetch and merge changes from a remote branch.
Viewing History
- git log
View the commit history. - git log --online
View a compact version of the commit history. - git show <commit_hash>
Show details of a specific commit. - git blame <file>
Show who last modified each line of a file.
Undoing Changes
- git revert <commit_hash>
Create a new commit that undoes the changes made in a specific commit. - git reset --hard
Discard all changes in the working directory and staging area. - git checkout -- <file>
Discard changes to a file in the working directory.
Stashing Changes
- git stash
Stash the current changes in the working directory. - git stash pop
Apply the most recent stash and remove it from the stash list. - git stash list
List all stashed changes. - git stash drop
Drop a specific stash.
Tagging
- git tag <tag_name>
Create a new tag at the current commit. - git tag -d <tag_name>
Delete a tag. - git push origin <tag_name>
Push a tag to the remote repository.
Steps to Create a GitHub Account
1. Visit GitHub
Open https://github.com/in your browser.
2. Click "Sign Up"
Find the "Sign Up" button at the top-right corner.
3. Fill Out the Form
Enter your email address.
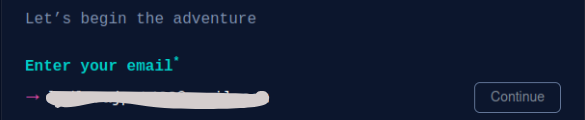
Create a strong password.

Enter a username.

4. Complete CAPTCHA
Solve the verification puzzle and click Create Account.
5. Verify Email
Look for a verification link in your email box and click on it.
6. Select a Plan
Select the Free Plan to begin.
7. Customize (Optional)
Respond to optional questions or skip to finish up.
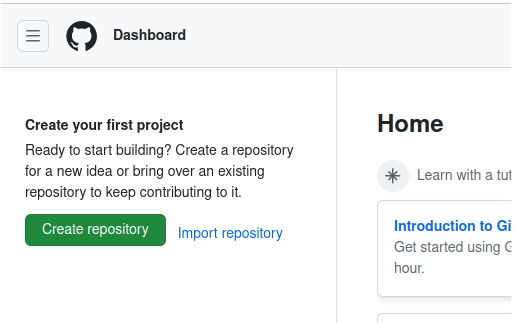
8. Discover Your Dashboard
After set up, you can create repositories or browse projects.
Steps to Create a Repository on GitHub
1. Go to Repositories
From your GitHub dashboard, click the Repositories tab or the green New button.
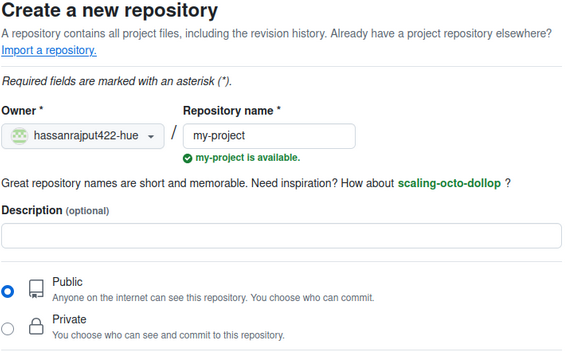
2. Create a New Repository
- Repository Name: Enter a unique name (e.g., my-project).
- Description (optional): Add a brief description of the repository.
- Visibility: Choose between Public (everyone can see) or Private (only you and collaborators).
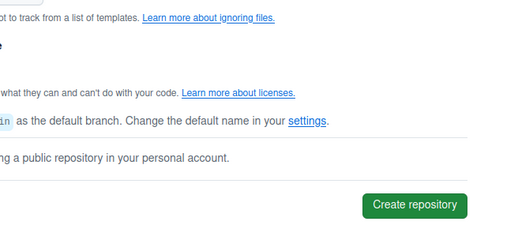
3. Initialize the Repository
- Check the box Add a README file if you want to include a starting README.
- Optionally, add a .gitignore file and choose a license.

4. Create the Repository
Click the Create Repository button at the bottom of the form.
5. Add Files or Clone
- Use the web interface to upload files.
- Or, copy the repository URL to clone it to your local machine using Git:
How to add a security key to Git Hub with Firefox?
1. Log in to Your GitHub Account
Open GitHub in Firefox and login to your account.
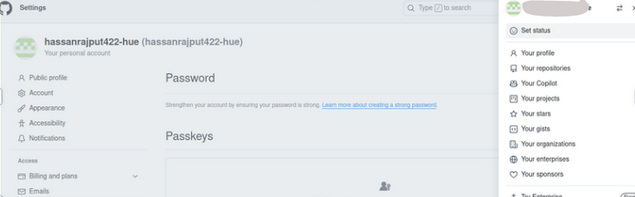
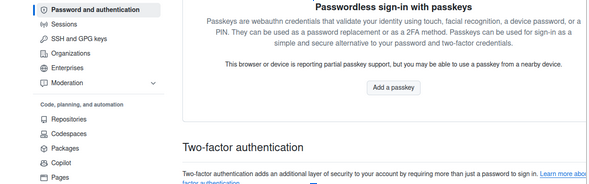
2. Go to Security Settings
- Click on your profile picture in the top-right corner and select Settings.
- In the left sidebar, navigate to Account Security.
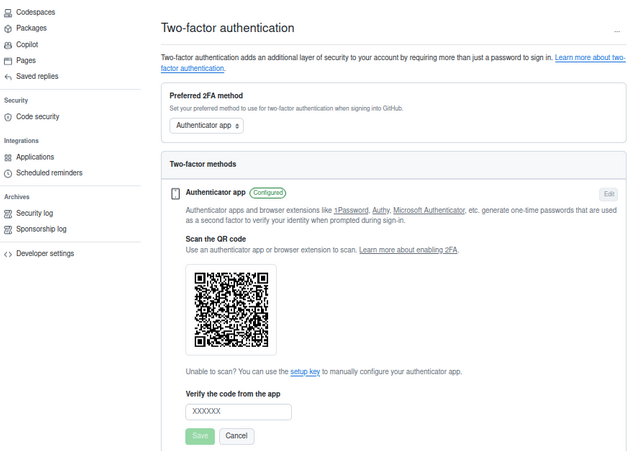
3. Enable Two-Factor Authentication (2FA) (if not already enabled)
- If you haven't set up 2FA, you'll need to do this first:
- Click Enable two-factor authentication.
- Choose the Authenticator App or SMS as your primary method and follow the steps to enable it.
4. Scan the QR Code in the Google Authenticator App
- Open your authenticator app (e.g., Google Authenticator, Authy, or Microsoft Authenticator).
- Use the app's "Add Account" option to scan the displayed QR code.
1. Enter the Code from the Authenticator App
- After scanning, your app will generate a one-time 6-digit code.
- Enter this code in the "Verify the code from the app" field on GitHub.
2. Save to Confirm the Setup
Click the Save button to enable 2FA for your GitHub account.
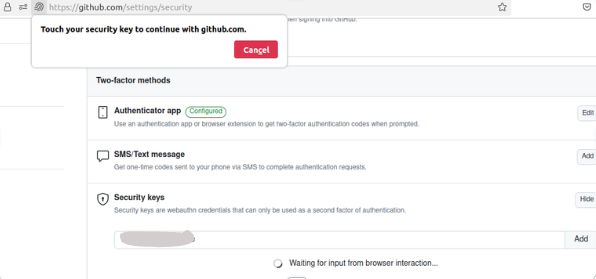
5. Add a Security Key
- In the Two-factor authentication section, click Manage security keys.
- Click Add security key.
- Follow the instructions to insert your security key (e.g., USB, NFC) into your computer.

6. Name Your Security Key
- Once authenticated, GitHub will ask you to name your security key for easy identification (e.g., "YubiKey" or "Main Security Key").
- Click Add.
7. To authenticate the security key to visit this token page link
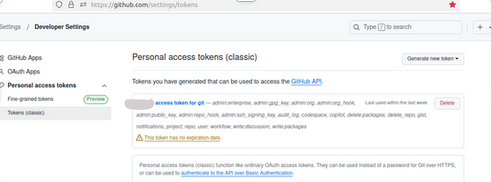
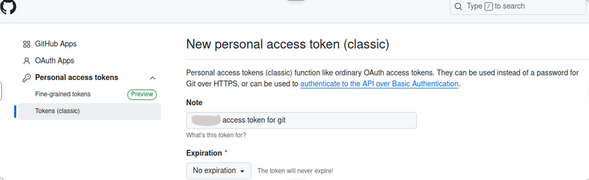
8. Click the "Generate new token" button on the right side, select the second option, and then click it.

9. Add a New personal access token (classic)
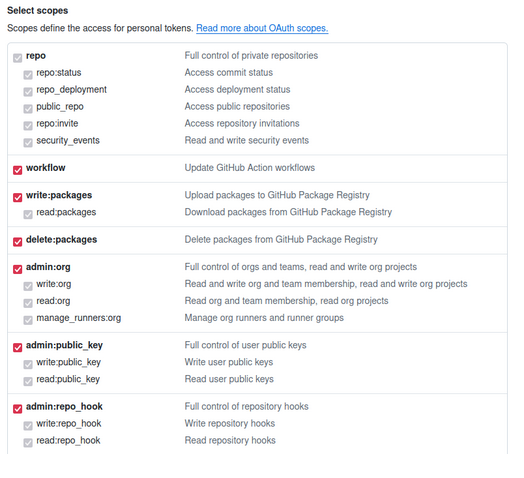
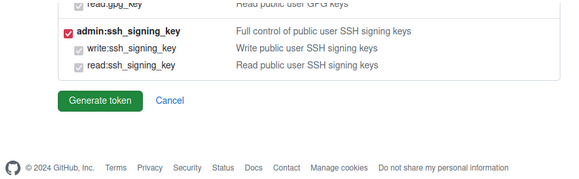
10. Select all the given checkboxes.
11. Click the "Generate token" button on the right side (green button).
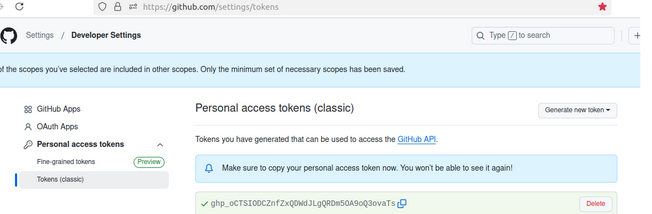
12. Finally, your personal access token (classic) is created. Copy it and use it as needed.
Install Git Bash
Simple Steps to Install Git Bash on Linux
1. Open Terminal
Launch the terminal on your Linux system.
2. Update Package List

3. Install Git

4. Verify Installation

Git is now set up and ready for use! You may execute all Git commands straight from your terminal.
Clone repository at the local
1. Navigate to the Target Directory
Move to the folder where you want the repository.

2. Run the Clone Command
Replace <repository-url> with the URL you copied:

3. Done
Your repository is now cloned locally!
3. Create a new branch in your repository
- This is the command to create a new branch
git checkout -b BRANCH_NAME
in my case:
git checkout -b custom-react-slider
4. Add your code files to your local repository
5. Commit your code changes on git
- git add
- git commit -m ‘commit’
- git push origin custom-react-slider
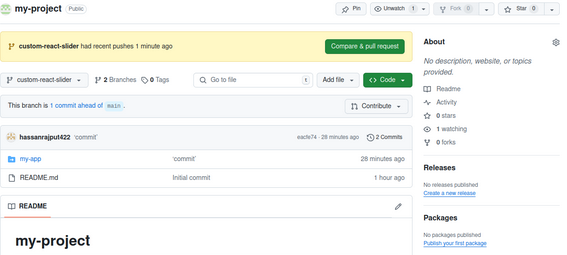
6. Create a pull request (PR)
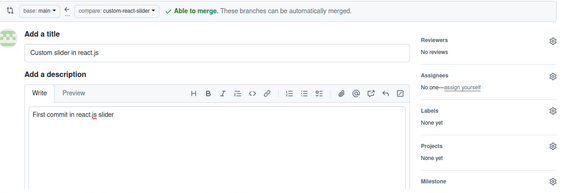
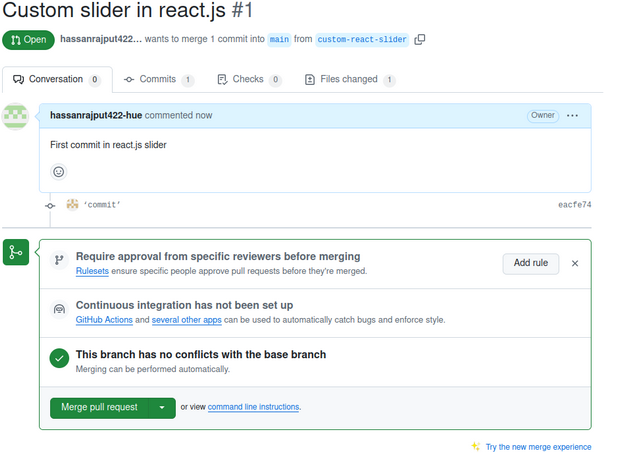
7. Merge a pull request (MR)
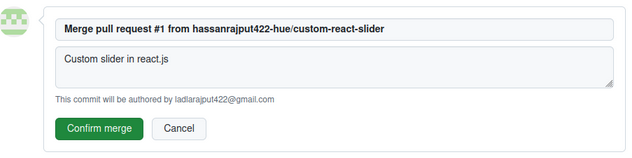
The pull request has been merged successfully

The pull request has been successfully merged into the main branch from the custom-react-slider branch.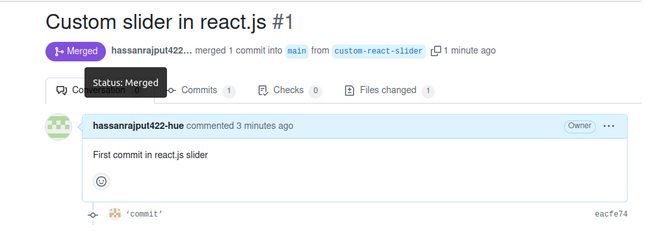
Conclusion
Git is a robust and essential tool for developers, enabling efficient source code management, collaboration, and version control. Its features such as branching, merging, and distributed development make it one of the most powerful systems for managing code and tracking changes over time. Whether you are working solo on a small project or collaborating with a team on a large open-source endeavor, Git offers a flexible, scalable, and reliable system for managing your codebase effectively.